Body progress pictures
Body progress pictures are one of the simplest ways to track changes in your body shape over time.
They are not perfect, but they can help you see changes that numbers often miss: posture, muscle shape, fat distribution, skin appearance, confidence, presentation, and your overall physical direction.
They can also give you a broader visual sense of how you are carrying yourself. Over time, your pictures may reflect changes in your demeanour, energy, posture, self-confidence, and general wellbeing — not as a medical measure, but as part of your lived physical expression.
The aim is not to judge yourself harshly. The aim is to create a repeatable process that helps you observe, learn, adjust, and keep moving forwards.
Why take body progress pictures?
Body composition can be difficult to measure accurately. Scales, body scanners, tape measures and other tools can all be useful, but they are also affected by variables such as hydration, food, sleep, training, posture and measurement error.
Pictures give you a practical visual record. Over time, they can help you see whether your current habits are moving you in the direction you want to go.
How often should you take them?
I recommend taking body progress pictures around once every four weeks. Weekly photos can be useful for some people, but for many people they are too frequent. Real body composition change takes time, and checking too often can make it harder to see the bigger picture. Every four weeks gives your body enough time to show meaningful change while still keeping you accountable.
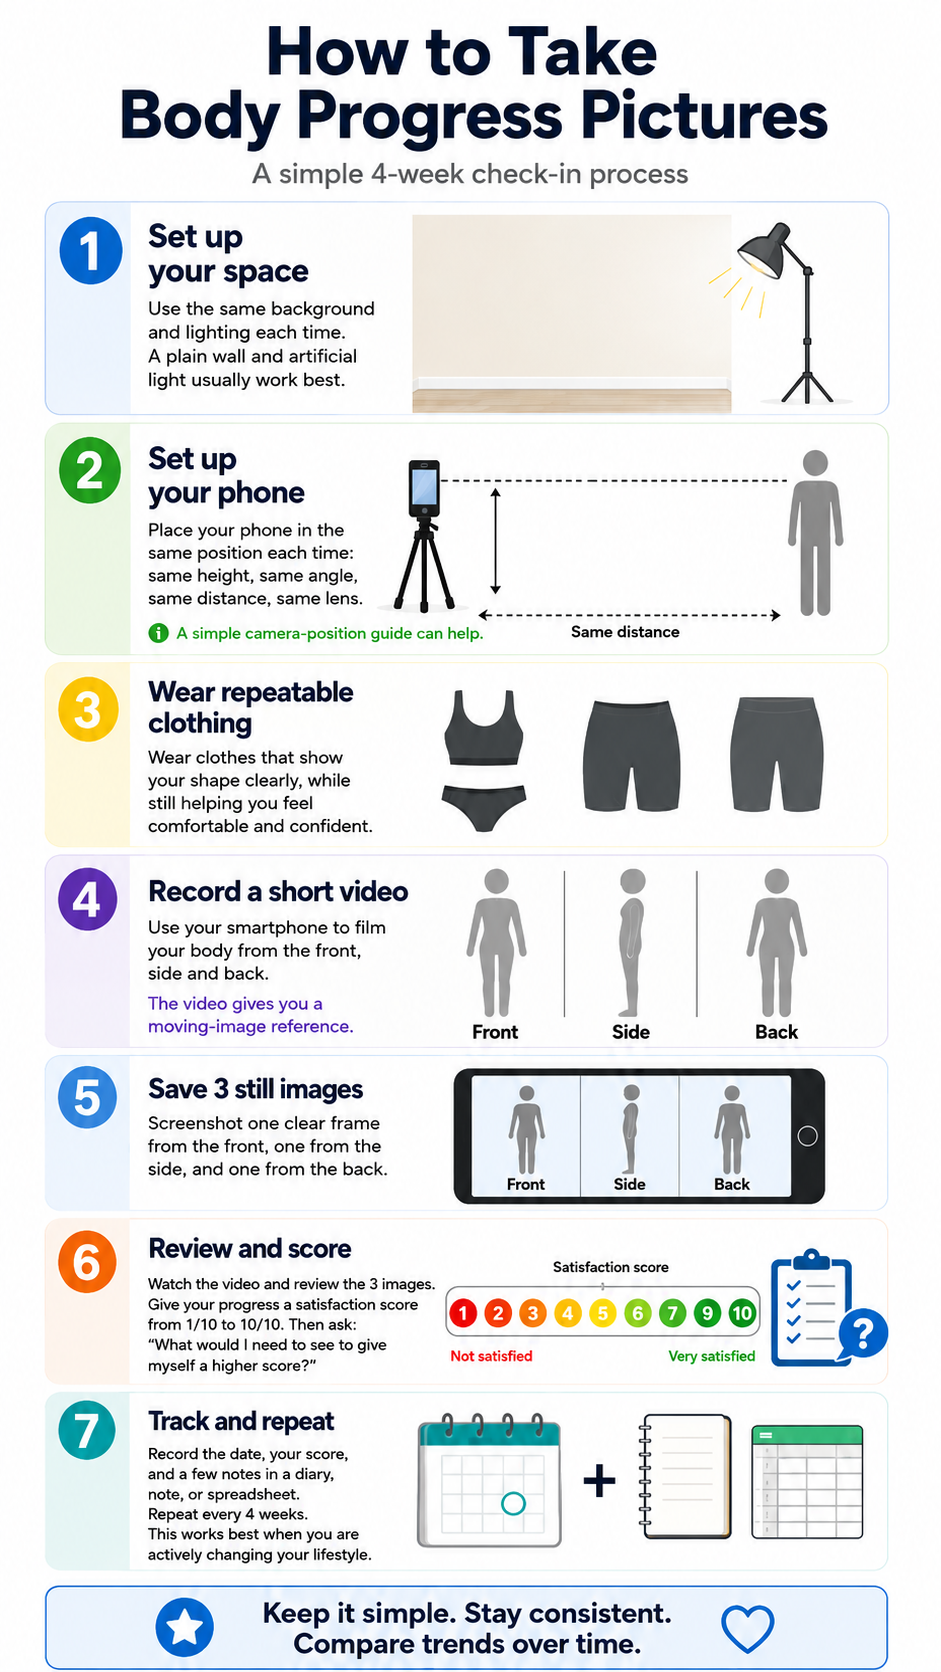
Step 1: Choose a consistent location
Find a simple space where you can repeat the same setup each time. Ideally use:
* the same room
* the same wall or background
* the same lighting
* the same time of day
* the same camera position
A plain wall with artificial lighting usually works well because it is easier to keep consistent. The goal is to create images that are both repeatable and favourable.
We want the pictures to be consistent enough that you can compare them over time, but we also want them to represent you well. Good lighting, a clean background, a sensible camera angle and comfortable clothing can all help you look your best while still keeping the process honest. This is not about manipulating the image or creating a false impression. It is about setting up the conditions properly so the pictures are clear, useful and fair.
Step 2: Set up your phone
Place your phone in the same position each time. Try to keep the same:
* height
* distance from your body
* camera angle
* lens setting
* lighting
* body position
Using a tripod or placing your phone on a stable surface can make this easier. You can either take photos directly or record a short video and take screenshots from the video afterwards.
The video has two purposes:
1. It gives you a moving image reference, so you can see how your body looks in motion, not just in a still image.
2. It makes it easier to capture consistent front, side and back positions without needing to reset the camera each time.
If you use video, slowly turn from front to side to back, then screenshot each position afterwards.
Step 3: Wear suitable clothing
Wear clothes that allow you to see your body shape clearly, while still feeling comfortable and confident. The more of your body shape you can see, the easier it will be to notice changes. However, you do not need to wear anything that makes you feel exposed or uncomfortable.
Choose clothing you can repeat each time, such as:
* fitted gym clothes
* shorts and a sports top
* underwear, if you are comfortable
* swimwear, if you are comfortable
The most important thing is that you can repeat the same clothing style each month.
Step 4: Capture three positions
Take images from three angles:
1. Front
2. Side
3. Back
Try to stand naturally. Do not force an exaggerated pose, flex heavily, or change your posture dramatically to make the image look better. A small amount of consistency matters more than perfection. If you use video, slowly turn from front to side to back, then screenshot each position afterwards.
Step 5: Review the images
After taking your pictures, review your video and three still images. Look for general trends, not tiny details. You might notice changes in:
* posture
* waist shape
* muscle tone
* body fat distribution
* clothing fit
Try not to overanalyse every small feature. One photo on one day does not tell the whole story. The value comes from comparing your pictures over months, not judging one image in isolation.
Step 6: Record your progress
Create a simple note, diary, Google Doc, spreadsheet, or folder where you can track your progress. For each check-in, record:
* the date
* your video, if you recorded one
* your three pictures
* a short note about your current habits
* a progress satisfaction score from 1 to 10
Use the score to rate how satisfied you are with the direction you are moving in.
A score of 1 means completely dissatisfied.
A score of 10 means completely satisfied.
This is not a score of your worth as a person. It is simply a reflection tool.
Step 7: Reflect on your score
After reviewing your video and screenshots, ask yourself:
What would I need to see in these pictures or video to give myself a higher score?
For example, you might want to see:
* clearer posture
* more visible muscle shape
* less body fat in a certain area
* better clothing fit
* more confidence in how you stand or move
This question helps you understand your own evaluations.
Sometimes the answer will point towards practical body composition goals. Other times, it may reveal that you are judging yourself too harshly, comparing yourself unfairly, or failing to recognise progress that is already happening. The aim is not to criticise yourself. The aim is to understand what you are seeing, what you value, and what progress would actually mean to you.
Step 8: Keep repeating the process
Repeat the same process every four weeks. Over time, you will create a visual timeline of your progress. At first, the changes may be subtle. But after several months, you may start to see a clearer story. This process is most useful when paired with active lifestyle change. If you are not changing your habits, the pictures will mostly track natural fluctuations in your body shape.
That can still build awareness, but it will not create change by itself. The real value comes from combining observation with action.
Take the pictures.
Review honestly.
Record the data.
Reflect on what you see.
Adjust your behaviours.
Repeat.
That is how the process becomes useful and sustainable.
With love, Coach Joe.